Difference between revisions of "Moiré pattern"
Jump to navigation
Jump to search
m |
|||
| (2 intermediate revisions by 2 users not shown) | |||
| Line 1: | Line 1: | ||
| − | |||
{{Bugs}} | {{Bugs}} | ||
| − | This page describes how the '''moiré pattern''' looks like in-game and how to fix it. | + | This page describes how the '''moiré pattern''' looks like in-game and how to fix or prevent it. |
| − | == | + | == Overview == |
| − | The '''moiré pattern''' is when textures appear to flicker | + | The '''moiré pattern''' is when textures appear to flicker or clash at a distance. This is because [[mipmap]]s have not been enabled under the [[MDL0]] or the textures have not been imported correctly. To help prevent this issue occurring in tracks, there are a few ways in which you can help negate the effect. The main – and best solution – is explained below. |
| − | == | + | == Importing and Encoding Mipmaps == |
| + | === Step 1 === | ||
| + | # Right click the .brres file and import a texture. | ||
| + | # Find the texture you would like to import. | ||
| + | # After selecting the texture, under '''MIP levels''' you can change the value to edit the number of mipmaps. | ||
| + | # Once done editing the mipmap levels, click Okay to make sure they save. | ||
| + | <gallery> | ||
| + | File:Importing Textures With Mipmaps.png|Importing textures with mipmaps | ||
| + | </gallery> | ||
| − | + | === Step 2 === | |
| − | + | # Double check your texture has mipmaps enabled. | |
| + | # Go to the '''MDL0''' of your .brres file. | ||
| + | # Find the material you would like to add mipmaps to. | ||
| + | # Click the material and then the material reference. | ||
| + | # Under the '''MinFilter''', change the node to '''"Linear_Mipmap_Linear"'''. | ||
| + | <gallery> | ||
| + | File:Enabling Mipmaps in the MDL0.png|Enabling mipmaps under the MDL0 | ||
| + | </gallery> | ||
| − | == | + | == Re-encoding Mipmap Levels == |
| + | If you have already imported your textures into your .brres file and are unsure how to add mipmaps, this simple step will help. | ||
| − | + | # Go to the texture you want mipmaps to be enabled on. | |
| − | + | # Right click the texture and click, '''"Re-Encode"'''. | |
| − | + | # Under '''MIP Levels''', enter the amount of mipmaps you want. | |
| − | + | # Once done editing the mipmap levels, click Okay to make sure they save. | |
| − | # Right click the | + | <gallery> |
| − | + | File:Re-encoding and Adding Mipmaps.png|Re-encoding textures with mipmaps after importing | |
| − | + | </gallery> | |
| − | |||
| − | |||
| − | |||
| − | |||
| − | # | ||
| − | |||
| − | |||
| − | # | ||
| − | |||
[[Category:Bug]] | [[Category:Bug]] | ||
Latest revision as of 18:53, 22 September 2021
Bugs
- Bugs in alphabetic order
- Harry Potter Effect
- Item Position Bug
- KCL Glitches
- Moiré pattern
- Off-Road Glitch
- Position Jump Bug
- Slow Motion Bug
- Start Line Bug
- Ultra Shortcut
- Underground Camera Bug
- Wiggler Glitch
- Z-fighting
- Advanced information
This page describes how the moiré pattern looks like in-game and how to fix or prevent it.
Overview
The moiré pattern is when textures appear to flicker or clash at a distance. This is because mipmaps have not been enabled under the MDL0 or the textures have not been imported correctly. To help prevent this issue occurring in tracks, there are a few ways in which you can help negate the effect. The main – and best solution – is explained below.
Importing and Encoding Mipmaps
Step 1
- Right click the .brres file and import a texture.
- Find the texture you would like to import.
- After selecting the texture, under MIP levels you can change the value to edit the number of mipmaps.
- Once done editing the mipmap levels, click Okay to make sure they save.
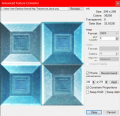
Importing textures with mipmaps

Step 2
- Double check your texture has mipmaps enabled.
- Go to the MDL0 of your .brres file.
- Find the material you would like to add mipmaps to.
- Click the material and then the material reference.
- Under the MinFilter, change the node to "Linear_Mipmap_Linear".

Enabling mipmaps under the MDL0

Re-encoding Mipmap Levels
If you have already imported your textures into your .brres file and are unsure how to add mipmaps, this simple step will help.
- Go to the texture you want mipmaps to be enabled on.
- Right click the texture and click, "Re-Encode".
- Under MIP Levels, enter the amount of mipmaps you want.
- Once done editing the mipmap levels, click Okay to make sure they save.
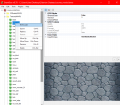
Re-encoding textures with mipmaps after importing
