Shadows
This page is a part of the Custom Track Tutorial. Back to the main tutorial page.
Introduction
Mario Kart Wii does not have a natural, automatic or realistic way to calculate and display shadows. Lighting can be created and "burned" in your custom track's model for a more realistic and professional looking track.
Using Shadow Mapping
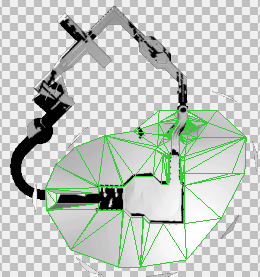
This is the method Nintendo uses on the original tracks. You might have noticed, if you examined a Nintendo track BRRES on any editor, that there is a texture similar to a 3D model which many tracks use. This is a secondary texture that is applied on top of the model, in a secondary UV channel, to create the image of shadows. You must use an advanced 3D Tool to create this shadow map by rendering a frame with the shadows. For best results in 3ds Max, render the frame with Mental Ray. Save this texture to your computer and apply it to a secondary UV channel, then use BrawlBox to import the model as DAE. In the materials folder, find your material and add a reference to the shadow map. In this reference, under "XF TexGen Flags", set "Coordinates" to "TexCoord1" to use the second UV channel. After that, you must copy shader settings and stage from a track and material which previously had shadow mapping.

This is the Blender method of adding shadows, created by Lovelifeandtpose024.
This is a more complete tutorial on how to create lighting in custom tracks, created by TL. Note that a shadow map is just a black and white version of a lightmap.
This is the Blender 2.79 method of adding shadows to custom tracks made by Rinorocks.
Written Tutorial
Here is a written version of Lovelifeandtpose024's tutorial with more detail. Updated for Blender 2.9.
First, some things need to be set up in Blender.
- Set the render engine to Cycles and (optionally) set the device to GPU Compute if you have a GPU.
- Join all the objects that you want shadows to appear on by shift-clicking to select multiple and pressing Ctrl-J.
- Go to the object data properties (green triangle) and under UV Maps click + to add a new UV Map.
- Rename the map to "Shadowmap" or similar and click the camera icon. Be sure to select the new map as well.
- Open the Shading workspace.
Next, we need to set up the shading. For each material, perform the following steps:
- Select the material in the Material Properties tab (orange sphere).
- Add an image texture node with Shift-A. Don't plug it into anything.
- Click "+ New" and create a new image with the following settings:
- Name: "Shadow" or similar
- Size: 1024x1024
- Alpha: Unchecked
- Add two UV Map nodes with Shift-A. Plug them into each of the image texture's Vector input. Set the UV Map to the appropriate map in each node.
- Finally, select the Shadow texture node. Make sure nothing else is selected. This is important because the shadow will be baked into whichever texture is selected.
- Repeat these steps for every other material included in your shadow object.
The finished node setup should look similar to this:
Now we can begin creating the shadows.
- Go into edit mode with Tab, select all with A, and unwrap the shadow object. For this, there are two good options.
- U > Project From View is useful if you want a top down projection of the track. Use Numpad 7 to set the viewport to a top view.
- U > Smart UV project will allow you to have shadows on walls. The default settings should work fine.
- Now you will save the project. It might be a good idea to create a backup at this point as well. IMPORTANT: Do NOT save your project from now on! You will need to go back to its current state.
- In Object Mode, use Shift-A to add in a sun lamp. In Rendered view, move the yellow dot to change the direction from where the light is coming. You can set the light up however you want.
- Any textures with transparency will cast box shadows. This is an easy fix. In the shader editor with the material, plug the alpha output from the image texture node to the alpha input in the Principled BSDF.
- It's time to bake the texture! Select the object that will have shadows and do the following steps:
- Go to the Render Properties tab.
- Click the drop down menu labeled "Bake".
- Set "Bake type" to "Shadow" and hit the Bake button.
- The most common error that will come up is a circular dependency. If you get this error message, it means you did not have the right thing selected in the shader editor.
- When the bake is complete, it will be viewable in the UV Editor.
- Save your image externally by clicking Image* > Save As.
- Next you must lighten the shadows. The easiest way to do this is by changing the brightness of the exported image using your favorite image editor.
- Now open the file you previously saved.
- Replace the old Shadow texture with the newly baked texture.
- Separate the object by material.
- Export the project as an FBX and convert it to DAE as normal.
There are some things that need to be set up in BrawlBox in order for the shadows to appear correctly in game.
- Import and set up your course model as normal. Also import your new shadow texture.
- Add a shadow shader from another course.
- In another window, open a Nintendo course file.
- Navigate to the Materials section of the MDL0 file.
- Find a material that has shadow mapping by looking at its texture references. If one of the references has "Shadow" in its name then you have found one.
- Check which shader the material uses. For example, Yoshi Falls uses Shader1 as its shadow shader.
- Export the shader.
- Now, import the new shader to your own MLD0 file.
- Each material that shadows appear on needs another texture reference. Right click each material, click "Add new reference", and rename the reference to the name of your shadow texture.
- In the texture reference settings, set the texture coordinates to TexCoord1 so that it uses the second UV Map.
- Each material that has shadows needs to use the shadow shader. In the material settings, change the shader to the one you just imported.
- Finally, set up all the other materials to your liking based on the Creating a BRRES with BrawlBox tutorial.
If all went right, your track should appear correctly with your own shadow map!
Using Vertex Colors
This cannot be done in SketchUp. Exporting the model containing vertex colors as DAE and importing in BrawlBox will automatically enable vertex colors, as long as you use the import settings seen in the Creating a BRRES with BrawlBox tutorial. This method can be combined with shadow mapping. Below is a video by TL explaining how to do this.
Using Darker Textures
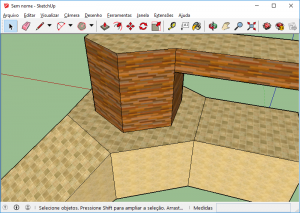
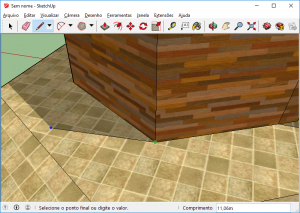
This is a destructive and far less efficient, but easier way of creating shadows in your track. In SketchUp, activate the display of shadows and edit it in SketchUp's shadow dialog (the shadows generated here will not be exported as either OBJ or DAE) and then divide your model into smaller parts using the shadows as a base, as shown in the images. Texture the shadowed areas with a darker texture and then import it.
The disadvantages of this method are the difficulty of doing this on more complex models; the higher file size and higher chance of creating a Slow Motion Bug can be caused due to more textures and polygons. Shadow maps also makes shadows more realistic.
Post-effects for Shadows
Also, in the collision model, you can make the shadowed areas have a different KCL flag for a different post-effect lightning to be used on top of the player when you're under the shadow.
Visualizing Your Shadows for the Collision Model Using 3ds Max
When you have created a shadow map and want to outline the shadows to get darker areas in your collision model, you have to know exactly which parts of your model are under a shadow and which parts are not. Using 3ds Max, you can easily visualize your shadows, which you can then outline in your collision model to separate areas which are and which are not under a shadow. First, export your course model as DAE using BrawlBox as well as the associated textures. Import these into 3ds Max. Select the objects in your model on which the shadow map is applied. Add an Unwrap UVW modifier on these objects. Change the UV Map Channel to "2" and select "abandon" on the popup which follows. Then change back to UV Map Channel 1 and now select "move" on this popup. Next, apply the shadow map texture on all objects which share the shadow map and you are done. If you prefer to create collision models with SketchUp, you can get the shadow image in the program by exporting from 3ds Max as OBJ and importing into SketchUp with the QuadFace Tools OBJ Importer plugin.
- Note that switching to the second UV Map Channel in Blender (in the correct view mode) will also show the lighting.
Main Tutorials
Introduction –
Textures –
Scale –
Modeling ⇒ Using Blender –
BRRES: CTools
BRRES: BrawlBox –
BRRES: RiiStudio –
Minimap –
Solidity –
KCL: Wiimms Tools –
KMP Editing
Object Editing –
Cameras –
Cannons –
Post-effects –
Videos
Battle Arenas
Battle Arenas –
Enemy routes in battle arenas ⇒ Using Wiimm's Tools –
Coins
Misc. Tutorials
Getting Files –
BrawlBox Tricks –
Animations –
Shadows –
Mipmaps
Custom Effects –
Moving Terrain –
Music –
Ports –
Paint Remakes –
Tutorial Archive
Extended presence flags: Track Tutorial –
LE-CODE Track FAQ
Testing and Reviewing
Testing a Track –
Visual Review –
Track Transformation –
Fixing Errors
Software
3D Tools –
BrawlBox –
CTools Pack –
KMP3D –
KMP Cloud –
KMP Modifier
Lorenzi's KMP Editor –
MagicY –
Material Tool –
Post-Effect Editor –
Wiimms SZS Tools –
Wiimm's Tool Manager
Other
KMP Objects –
Custom Objects –
Model Database –
Tutorial Archive


