Remaking Paint Levels in SketchUp
Introduction
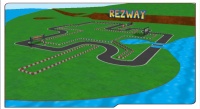
There are a quite a few paint levels in CTGP Revolution and other distributions. Paint levels were impressive when level hacking first started, but it's now possible to make much nicer looking levels with Google SketchUp.
This tutorial presents two methods for remaking Paint tracks. The first method explains how take a picture of the original track and put it into SketchUp at the same scale and position as the original to use as a guide for making a new model. The second method explains how to import the original level's model into SketchUp and edit it directly.
Note: Please obtain permission from the original track author before remaking a level.
Method 1: Using an Image
Most paint levels are simple enough in terms of geometry that they can be rebuilt quickly and easily in SketchUp. This section will show you how to get the same scale and road position as the original track so that your new level will be compatible with the old track's KMP.
Much of the advice in this section can also be applied to creating a track from a hand-drawn track design or remaking a SNES or GBA track from a map image. You can use the same techniques to analyze Nintendo-made tracks to get the correct scale for new tracks.
Required Tools
- SZS Modifier
- SketchUp
- CTools
- An image editor, such as Paint.NET or GIMP.
- A text editor such as Notepad or a pen and paper.
Step-by-Step
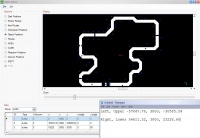
- Make a copy of the level's SZS. This should be done to prevent saving over the original.
- Open the level in SZS Modifier and click on the course.kmp file to open it in the KMP Editor.
- Zoom in as much as you can while still having the whole minimap in view.
- Move four objects to each corner of the visible part of the window. Write down the X and Z positions in notepad or on a piece of paper. These numbers can be rounded up or down a bit. You could also do this with just two objects placed on opposite corners of the window.
- Label the values left upper corner, right lower corner etc. Also place an object at origin (X and Z are both 0.00). Make sure it is highlighted red.
- Take a print screen and then paste into a photo editor. Use the paint bucket tool on the black background to change it to a lighter color. This will make it easier to see lines in SketchUp, and will make the blue object positions more visible.
- Crop the image along the edges of the formerly black area, as close to where you placed your objects as possible, and save.
- Start a new SketchUp project. Make sure to use the simple meters template.
- Look at the values you wrote down in notepad. Find the absolute distance between points. For example, if the upper left corner has a Z value of -23380 and the lower left corner has 30050, the distance is 53430. In other words, add the two values, disregarding the negative sign.
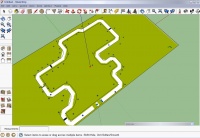
- Create a rectangle from origin (where the red, green and blue axis lines meet) in SketchUp. Type the X and Z distances you found for its dimensions.
- Now import the print screen you made and stretch it across the rectangle. You will not need to rotate the image or flip the image; it is already in the proper orientation.
- Move the rectangle so that the red dot is on origin. (Only move on the red and green axes. You can tell because the line when moving will be that color.)
- Go back to the KMP and find the Y value of an object that's directly on the track. (This Y value will likely be slightly higher than the actual road surface.)
- Move the rectangle up along the blue axis the same amount or slightly less (200-500m) than that Y value.
- If parts of the paint track varied in height, you can find the correct Y value for those parts by looking at objects in the KMP. Subtract or add to the main Y value as appropriate.
Conclusion
Now you're free to remake the track using the minimap image as a rough guide. You'll only need to make minor edits to your KMP, depending on how much is changed in the new version of the level. Delete the guide image from the texture browser before exporting the level. (Its dimensions are not in powers of two, and will prevent the model from being displayed in the BRRES Editor.)
Method 2: Importing a Model
This section explains how to import the original mesh of any track into SketchUp. This method can also be used to import models of Mario Kart Wii objects to SketchUp.
Required Tools
An Exporter/Importer Plugin:
Step-by-Step
- Open the track in CTools.
- Export the track's course model, course_model.brres.
- Open the course model in the BRRES Viewer.
- In the BRRES Viewer, go to course_model.brres --> 3DModels(NW4R) and double click on course.
- The track should show up in the main window.
- Click on Model > Export > OBJ.
- Save your OBJ file. It is recommended to create a new folder for your OBJ file since the course's textures will also be exported to the same folder.
- Start a new SketchUp project. Make sure to use the simple meters template.
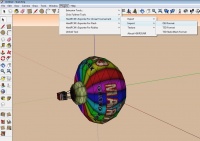
- If you are using HardPCM's plugin, click on Plugins > HardPCM's Exporter for Unreal Tournament > Import > OBJ Format then browse for your OBJ file.
- If you are using Fluid Importer, click on File > Import... then browse for your OBJ file.
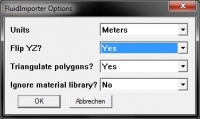
- Use following settings when importing your OBJ with Fluid Importer and click OK.
- Units: Meters
- Flip YZ: Yes
- Triangulate Polygons: Yes
- Ignore Material Library: No
- Use following settings when importing your OBJ with Fluid Importer and click OK.
- Be sure to place your model at origin (the zero point.) You may need to rotate the model.
- Right-click the model and click Explode. You might have to do this multiple times if there are sub-groups.
Conclusion
Now you can improve the track's model and remap the textures. If there are some unused textures left because you replaced them with others, you should delete them from the material window.
Links
Main Tutorials
Introduction –
Textures –
Scale –
Modeling ⇒ Using Blender –
BRRES: CTools
BRRES: BrawlBox –
BRRES: RiiStudio –
Minimap –
Solidity –
KCL: Wiimms Tools –
KMP Editing
Object Editing –
Cameras –
Cannons –
Post-effects –
Videos
Battle Arenas
Battle Arenas –
Enemy routes in battle arenas ⇒ Using Wiimm's Tools –
Coins
Misc. Tutorials
Getting Files –
BrawlBox Tricks –
Animations –
Shadows –
Mipmaps
Custom Effects –
Moving Terrain –
Music –
Ports –
Paint Remakes –
Tutorial Archive
Extended presence flags: Track Tutorial –
LE-CODE Track FAQ
Testing and Reviewing
Testing a Track –
Visual Review –
Track Transformation –
Fixing Errors
Software
3D Tools –
BrawlBox –
CTools Pack –
KMP3D –
KMP Cloud –
KMP Modifier
Lorenzi's KMP Editor –
MagicY –
Material Tool –
Post-Effect Editor –
Wiimms SZS Tools –
Wiimm's Tool Manager
Other
KMP Objects –
Custom Objects –
Model Database –
Tutorial Archive
