Solidity
This page is a part of the Custom Track Tutorial. Back to the main tutorial page.
Introduction
The KCL file contains all the solidity information of a track, as well as event triggers that trigger when touched by a vehicle, item, or object. For example, drivable roads are stored within KCL files, as well as fall boundaries that cause you to respawn (which should be triggered by falling off the track or into a hazard). Cannon triggers are also found here. More simply put, the BRRES model is just for sights while all the information about being able to touch stuff in-game is stored in the KCL file. This tutorial covers the how to create a collision model and how to generate a KCL file.
Benefits of a Collision Model
A separate collision model provides several potential benefits:
- It can help prevent super shortcuts and other glitches by putting in invisible walls and fall boundaries, or removing troublesome surfaces.
- You can fix problems like hitting edges that are below roads.
- If your level has any complex geometry that can't or seldom will be touched by karts, this geometry can be deleted or simplified.
- Simplifying collision can help prevent lag, FPS drops and other issues caused by the game making complex calculations when objects collide and replicating the results to players.
Some Custom Tracks such as F Boats and Hot Shelter have, on their pages, download links for models which were used while creating the tracks; with KCL models included. You can view those on SketchUp and compare them to the normal models to see the differences.
Making a Collision Model
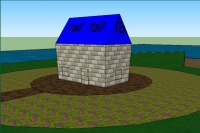
To create a collision model in Google SketchUp, first make a copy of your normal track's SketchUp file, making sure not to overwrite the old one.
In the collision model, you should remove:
- Everything that you're never able to touch ingame. For example, decorations which are far away from the normal track, and also ceilings which are very high.
- Small details which you normally go right through, such as small plants.
You should also add to the collision model:
- Fall boundaries. Planes which, when touched, make you "die" and get respawned, such as water, lava or an air fall.
- Cannon triggers, in case you plan to add a cannon to you track. More infomation in the Cannon section.
- Invisible walls to prevent you from reaching places you're not supposed to. Make sure the walls are in logical positions, not unexpected ones.
Understanding KCL Flags
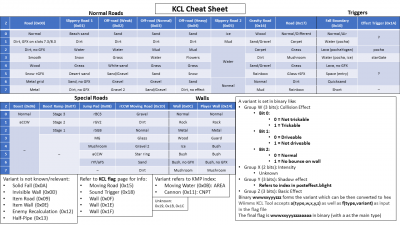
To know what exactly happens when your player, a CPU player or an item touches a specific surface, KCL flags are set to them. The flag is composed of a main type and variant, which in turn is composed of 4 different effects. A combination of them forms a flag. The image shows a summed up cheat sheet of KCL types, basic variants and different effect flags, but you should consult the KCL flag page for a complete list of flags and more in-depth information.
The KCL flags are defined by:
- A basic type, such as road, off-road, boost, wall or fall boundary.
And a variant, which is composed of:
- A basic variant (Z), which is specific to each type, such as whether a road is dirt, wood or snow or a wall is rock or metal.
- A shadow effect (Y). This variant refers to an index in the posteffect.blight file of a light to be applied to the character or object that is on top of the road. More information in the Post-effects and Shadows pages.
- An intensity (X). These values are not well known and should not be bothered with right now.
- A collision effect (W), which is divided into 3 bits: Whether the road is trickable or not, driveable or not, and whether the wall bounces you or not.
If this is your first time creating a collision model/KCL file, you should mainly be concerned about the basic type, basic variant and the trickable/not-trickable part of the collision effect.
Defining KCL flags
You will now change the textures in your model so each one represents a different combination of each type and variant. For example: if a section of your track is a normal road and another one is a dirt road, each should be textured with a different texture. The same applies for different types of walls, fall boundaries and off-road sections. Trickable sections of the track (such as hills or edges of ramps) also should get their texture (you should not set your entire track to be trickable, as it will be possible to jump+trick anywhere).
You can right click any surface and Select all with same material then use the Paint Bucket to replace the texture. You don't have worry about the looks of this collision model: this model will not be displayed ingame. It will simply be used for KCL generation.
When using SketchUp, you should give the textures descriptive names, similar to the solidity value you want to give them. For example:
- A normal road can be named Road_Normal.
- A trickable section of a wood road can be named Road_Wood_Trick.
- A metal wall can be named Wall_Metal.
- A section of a boost pad that is under a shadow can be named Boost_Shadow.
Naming your textures like this isn't completely necessary, but can help you avoid confusion, as each combination of flag and variant will be applied to a different texture. You can also include the numbers of the flags you plan to use in the names, to identify them easier later. For example, an ice wall could be named Wall_Ice_0C_4.
To rename textures in SketchUp, open the Materials Browser and select the texture you want to change. Above the list of textures is the material's name. Simply type in a new one. It can be helpful to change the colors of textures on your collision model so you can easily identify each type of collision surface. This can be done easily by double-clicking any texture in the Materials Browser window, then adjusting the color options for that texture. To reset a texture's color, simply click reset color. You can make roads blue, solid falls red and fall boundaries and triggers transparent, for example. Textures which are not being used should be deleted from the material window's "In use" section.
If you are using a different 3D editor, the principles are the same. If you are using 3ds Max you can rename polygons, so it's recommended to give them descriptive names as well.
Triggers
The types of trigger that exist in the KCL are mainly four: fall boundary, cannon, sound and effect.
- Fall boundaries make you "die" when touching them. They are similar to solid falls, but you will on top of the solid falls and go right through fall boundaries. They can be used to trigger a water splash (pocha) or other effect when touched.
- Cannon triggers are explained in the Cannon page; when touched, a cannon is triggered and you are taken to the destination KMP point.
- Sound triggers can make different sounds play or stop playing, which depends on the variant and track slot used.
- Effect triggers can trigger a water splash (pocha) without a fall boundary.
Half-pipe ramps
To create trickable half/quarter-pipes in your KCL, the edge of the ramp should have the half-pipe main flag (which is 0x13) and you should also model an invisible wall on top of it (flag 0x0D) to prevent players from falling behind the ramp. 1000 units is a good height for the invisible wall.
Lowering walls
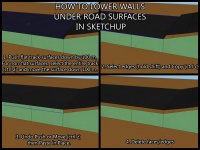
If your level has any walls that are directly underneath or bordering other drivable surfaces, it's possible that you will face a bug in which the walls appear to extend further than they're supposed to. If you run into this while testing, you might need to move the top edges of those surfaces downward at least 50-100 units. This will prevent vehicles from striking this invisible boundary when driving on the surfaces above those walls. Click the image to the right for some tips. If using Wiimms SZS Tools for KCL creation, then you can use the lower walls script instead. You only need to do this if, after testing, you notice this problem happen; otherwise, there's no need to worry about this.
Generating a KCL
Once you are done editing your collision model, export the OBJ as usual. Then, you can use one of the following methods to convert your model into a KCL file usable by Mario Kart Wii:
Wiimms SZS Tools
Currently, the best method to create KCL is to use the wkclt tool of Wiimms SZS Tools. It creates an optimized KCL file directly from the exported OBJ file. It's also possible to export the KCL back into OBJ or to write small scripts to modify positions or the KCL flags in an algorithmic way. Follow the Creating a KCL with Wiimms Tools tutorial.
CTools and SZS Modifier
This is an outdated and not recommended method of creating your KCL file. It is less efficient, takes significantly longer and might generate a KCL with problems or might not even create the KCL at all. Follow the tutorial on the KCL Tutorial (CTools and SZS Modifier) page.
Links
Main Tutorials
Introduction –
Textures –
Scale –
Modeling ⇒ Using Blender –
BRRES: CTools
BRRES: BrawlBox –
BRRES: RiiStudio –
Minimap –
Solidity –
KCL: Wiimms Tools –
KMP Editing
Object Editing –
Cameras –
Cannons –
Post-effects –
Videos
Battle Arenas
Battle Arenas –
Enemy routes in battle arenas ⇒ Using Wiimm's Tools –
Coins
Misc. Tutorials
Getting Files –
BrawlBox Tricks –
Animations –
Shadows –
Mipmaps
Custom Effects –
Moving Terrain –
Music –
Ports –
Paint Remakes –
Tutorial Archive
Extended presence flags: Track Tutorial –
LE-CODE Track FAQ
Testing and Reviewing
Testing a Track –
Visual Review –
Track Transformation –
Fixing Errors
Software
3D Tools –
BrawlBox –
CTools Pack –
KMP3D –
KMP Cloud –
KMP Modifier
Lorenzi's KMP Editor –
MagicY –
Material Tool –
Post-Effect Editor –
Wiimms SZS Tools –
Wiimm's Tool Manager
Other
KMP Objects –
Custom Objects –
Model Database –
Tutorial Archive


