Shadows
This page is a part of the Custom Track Tutorial. Back to the main tutorial page.
Introduction
Mario Kart Wii does not have a natural, automatic or realistic way to calculate and display shadows. Shadows can be created and "burned" in your custom track's model, for a more realistic and professional looking track. There are multiple ways to do it; combining more than one method is also possible.
Using Shadow Mapping
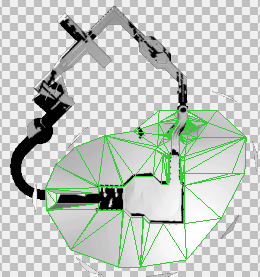
This is the method Nintendo uses on the original tracks. You might have noticed, if you examined a Nintendo track BRRES on any editor, that there is a texture similar to a 3D model which many tracks use. This is a secondary texture that is applied on top of the model, in a secondary UV channel, to create the image of shadows. You must use an advanced 3D Tool to create this shadow map by rendering a frame with the shadows. For best results in 3ds Max, render the frame with Mental Ray. Save this texture to your computer and apply it to a secondary UV channel, then use BrawlBox to import the model as DAE. In the materials folder, find your material and add a reference to the shadow map. In this reference, under "XF TexGen Flags", set "Coordinates" to "TexCoord1" to use the second UV channel. After that, you must copy shader settings and stage from a track and material which previously had shadow mapping.
This method is recommended for roads and most solid ground.
This is the Blender 2.79 method of adding shadows to custom tracks made by Rinorocks, which includes the creation of the shadows and how to add them in BrawlBox.
A Blender 2.80 method also exists, with a tutorial created by Lovelifeandtpose024. It also includes the creation of shadows and adding them in BrawlBox or BrawlCrate.
Using Vertex Colors
This method is easier if you're familiar with painting vertex colors in your advanced 3D tool. Exporting the model containing vertex colors as DAE and importing in BrawlBox will automatically enable vertex colors, as long as you use the import settings seen in the Creating a BRRES with BrawlBox tutorial. This method can be combined with shadow mapping. For example, you might want to use shadow mapping on the roads and vertex colors on the walls.
Using Darker Textures
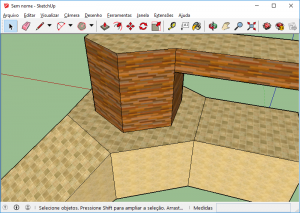
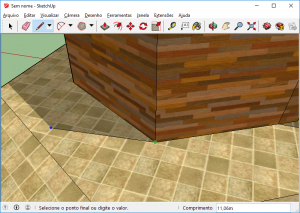
This is a less efficient, but easier way of creating shadows in your track. In Sketchup, activate the display of shadows and edit it in Sketchup's shadow dialog (the shadows generated here will not be exported as either OBJ or DAE) and then divide your model into smaller parts using the shadows as a base, as shown in the images. Texture the shadowed areas with a darker texture and then import it.
The disadvantages of this method are the difficulty of doing this on more complex models; the higher file size and higher chance of creating a Slow Motion Bug due to more textures and polygons. Shadow maps also makes shadows more realistic.
Post-effects for Shadows
Also, in the collision model, you can make the shadowed areas have a different KCL flag for a different post-effect lightning to be used on top of the player when you're under the shadow.
Visualizing your shadows for the collision model using 3DS Max
When you have created a shadow map and want to outline the shadows to get darker areas in your collision model you have to know exactly which parts of your model are under a shadow and which parts are not. Using 3DS Max you can easily visualize your shadows, which you can then outline in your collision model to separate areas which are and which are not under a shadow. First export your course model as a DAE using Brawlbox as well as the associated textures. Import these into 3DS Max. Select the objects in your model on which the shadow map is applied. Add an Unwrap UVW modifier on these objects. Change the UV Map Channel to 2 and select 'abandon' on the popup which follows. Then change back to UV Map Channel 1 and now select 'move' on this popup. Next, apply the shadow map texture on all objects which share the shadow map, and you are done. If you prefer to create collision models with Sketchup you can get the shadow image in Sketchup by exporting from 3DS Max as obj and importing into Sketchup with the QuadFace Tools obj importer plugin.
Main Tutorials
Introduction –
Textures –
Scale –
Modeling ⇒ Using Blender –
BRRES: CTools
BRRES: BrawlBox –
BRRES: RiiStudio –
Minimap –
Solidity –
KCL: Wiimms Tools –
KMP Editing
Object Editing –
Cameras –
Cannons –
Post-effects –
Videos
Battle Arenas
Battle Arenas –
Enemy routes in battle arenas ⇒ Using Wiimm's Tools –
Coins
Misc. Tutorials
Getting Files –
BrawlBox Tricks –
Animations –
Shadows –
Mipmaps
Custom Effects –
Moving Terrain –
Music –
Ports –
Paint Remakes –
Tutorial Archive
Extended presence flags: Track Tutorial –
LE-CODE Track FAQ
Testing and Reviewing
Testing a Track –
Visual Review –
Track Transformation –
Fixing Errors
Software
3D Tools –
BrawlBox –
CTools Pack –
KMP3D –
KMP Cloud –
KMP Modifier
Lorenzi's KMP Editor –
MagicY –
Material Tool –
Post-Effect Editor –
Wiimms SZS Tools –
Wiimm's Tool Manager
Other
KMP Objects –
Custom Objects –
Model Database –
Tutorial Archive


