Modeling with Paint
Back to the main tutorial page.
Part 1 - Creating the Image
Open Paint and create a new 150x150 image. You have to make the image as small as possible, as long as it contains all of your course. You can make it bigger if you need to.
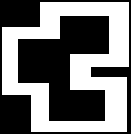
Before starting to paint, make the whole picture black (color #000000). This does not get recognized in the model importer.
First, set up some basic greyscales. Greyscales are colors with the same RGB values (e.g. #3F3F3F). If you use any 'colored' color, SZS Modifier will not be able to import it.
After the setup, you can start painting. Paint the map of your track, the same one that would get displayed in the bottom right of the screen in-game.
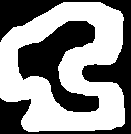
Remember that simpler drawings have higher chances of getting imported:
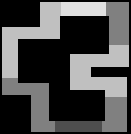
The grayscale must be set up like this: The higher you want the track to be, the closer to white. So...
If you want the track to be higher, you make it lighter. If you want it to be lower, make it darker.
To make ramps, use a gradient.
To make straight walls, you have to import really steep slopes, and use the Pinch tool to transform them into walls.
Part 2 - Importing the Image
Save your image as a PNG file. Make multiple image files, each with a different part of the road: One with the normal road, one with the offroad, one with the walls, etc. You have to do this so each can have its own texture and each gets its own behavior in-game.
In SZS Modifier, open the file "course_model.brres". In it, open the folder "3DModels(NW4R)" and the only file in it, "course".
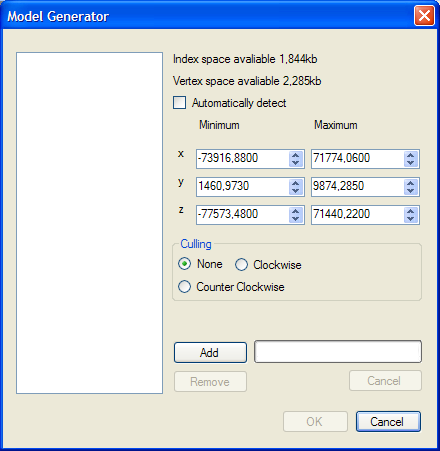
Wait, and soon a model of the course will appear. Select the polygon you want to import the model to, and open Tools--->Model Creator. A window should pop up, similar to this:
Uncheck "Automatically Detect" - that will probably make your track too big. But now, you're going to set values for your model, and you must use the same ones for every piece of the model that you're going to import, so it's better if you write them up.
Anyways, the Minimum X and Z must each be set to the same, and so the Maximum X and Z do (and it's better if all four are the same number, except for the Minimum being negative and the Maximum being positive - that's what you should do if the image is a square).
The Minimum and Maximum Y can't be the same, and you shouldn't make any of then under 0. Usually, the original ones that appear will do it, but you have to test - if your slopes end up too steep, decrease the difference between them. If your slopes end up too gentle, increase the difference between them. If there aren't slopes at all, it means that the Minimum and Maximum Y are the same.
Culling sets what is the right side of the model you're importing. That means:
- If you want to make a road, set it to Clockwise
- If you want to make a ceiling, set it to Counterclockwise
- If you want to make walls, set it to None
If you, for example, accidentally import the road as Counterclockwise, the character will try to stay under the road, but only for a second before being naturally pushed down by gravity. If you set it to None, both sides of the model will be visible and solid. That might sound like the better option, but it actually glitches a lot - there are huge chances that your Green/Red Shells, Bananas and Bullet Bills won't know what side to go and will disappear.
Tools
These are all available in the BRRES editor:
- Create KCL
This is explained in the Important Stuff section.
- Apply a Matrix
Used to increase and decrease the size of the model, as well as moving it certain distances.
- Minimap Control
This tool won't appear under normal circumstances. This is explained in the Minimap section of the tutorial.
- Model Creator
This is what you use to insert your Paint images in the file.
- Delete Polygon
After you imported all of your models, you'll notice that the ones you didn't mess with are still there. You might want to leave them there for a visual (such as a Rainbow Road track with Moonview Highway right under it), but in most cases, you want to delete them with this option.
- Retexture Polygon
This is explained in the Texturing section.
- Pinch
This will immediately switch to a top-down view of the model. You are able to distort the models with this tool.
After the Model is Done
Now, you follow the Texturing tutorial to see how to fix the colors of the track so that they are the way you want.
Links
Main Tutorials
Introduction –
Textures –
Scale –
Modeling ⇒ Using Blender –
BRRES: CTools
BRRES: BrawlBox –
BRRES: RiiStudio –
Minimap –
Solidity –
KCL: Wiimms Tools –
KMP Editing
Object Editing –
Cameras –
Cannons –
Post-effects –
Videos
Battle Arenas
Battle Arenas –
Enemy routes in battle arenas ⇒ Using Wiimm's Tools –
Coins
Misc. Tutorials
Getting Files –
BrawlBox Tricks –
Animations –
Shadows –
Mipmaps
Custom Effects –
Moving Terrain –
Music –
Ports –
Paint Remakes –
Tutorial Archive
Extended presence flags: Track Tutorial –
LE-CODE Track FAQ
Testing and Reviewing
Testing a Track –
Visual Review –
Track Transformation –
Fixing Errors
Software
3D Tools –
BrawlBox –
CTools Pack –
KMP3D –
KMP Cloud –
KMP Modifier
Lorenzi's KMP Editor –
MagicY –
Material Tool –
Post-Effect Editor –
Wiimms SZS Tools –
Wiimm's Tool Manager
Other
KMP Objects –
Custom Objects –
Model Database –
Tutorial Archive


