Difference between revisions of "Modeling with Blender"
m |
Maximiliano (talk | contribs) |
||
| Line 113: | Line 113: | ||
If you have made a KCL model, and you want to create your KCL with [[Wiimms SZS Tools|Wiimms KCL Tools]], you should do the same, but you should export it as .obj and enable 'Material Groups' in the .obj export settings. | If you have made a KCL model, and you want to create your KCL with [[Wiimms SZS Tools|Wiimms KCL Tools]], you should do the same, but you should export it as .obj and enable 'Material Groups' in the .obj export settings. | ||
| − | + | ||
| + | = Modeling with Blender 2.8x = | ||
This tutorial was written by [[Lovelifeandtpose024]]. Many things remain the same, but not all. This tutorial uses the EEVEE render engine. To make sure that you are in EEVEE rendering, go to the properties panel, click on the TV icon, and change the render engine to EEVEE. | This tutorial was written by [[Lovelifeandtpose024]]. Many things remain the same, but not all. This tutorial uses the EEVEE render engine. To make sure that you are in EEVEE rendering, go to the properties panel, click on the TV icon, and change the render engine to EEVEE. | ||
Revision as of 15:48, 25 July 2020
This tutorial is written because a lot of people who wanted to start using Blender had questions about it. We will go over the basics of modeling with Blender, but we will also look at how you can import your 3D models into Mario Kart Wii. Blender is a free program, and is compatible with Windows, Mac OSX and GNU/Linux. So let's start by downloading it here. Make sure you get the latest, stable build. In this tutorial we'll be using Blender 2.74. However, the latest version of Blender, version 2.81a, has significant differences from 2.74, so it may be a bit difficult to follow the tutorial on that version. It is recommended to use version 2.79b, as it is the latest version that has more tutorials for modeling for Mario Kart Wii that can easily be followed with it.
Basics
Interface
- A tutorial by MrKoeikoei
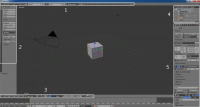
This is what Blender looks like when you open it for the first time. It will probably show a splash screen as well. Press enter to get rid of it. Number 1 in the printscreen is the info panel. It allows you to do a several things, such as importing, exporting, changing the interface and rendering your scene. At the right it displays useful information, such as the amount of vertices, the amount of faces and the selected object.
Number two is a very useful toolbar. You can hide or show it by pressing the T key on your keyboard. All the tools and options in this panel are separated by tabs, which you can see at the very left of the screen. These tabs don't appear in early versions of Blender. Under 'tools' you can find some basic transform tools and edit tools. Under the next tab, you'll find options that allow you to create basic shapes and objects, such as plains, cubes and curves. You won't need the other tabs for Mario Kart Wii. When you switch to edit mode, there will be some alternative tabs. We'll come to that later.
Panel 3 is part of the big 3D window. That is where your 3D model will be displayed. At the bottom there are some menus with options that the tabs in the previous panel offer you as well. After that are some unique settings. The first one allows you to change the object interaction mode. Right now we're in object mode. There are five other options you can select, but for Mario Kart Wii we will only be using two of them. The next drop menu lets you change the way the object are displayed. Only 3 of them are useful for Mario Kart Wii: solid, texture and wireframe. Right now it's set to solid.
Panel 4 is the so-called outliner. It gives you an overview of the scene graph. All course models are made up out of object. The outliner shows you the object that are in your 3D model. If you click the little eye behind the object name, you can view or hide an object without having to remove it.
Below the outliner you can find another panel: the properties panel. You can do a lot with it. At the very top of the panel you can see a lot of button. If you press one of those buttons, a different window will appear. By default it is set to the render window. You don't have to use this for Mario Kart Wii. Please mind that the very first button can be found on every panel I explained, this one doesn't change the window. You can use this if you want to load a different panel at that spot. I won't explain you the function of all windows in this tutorial, but feel free to mess around with them.
- To rotate around in your 3D window, hold the middle mouse button and move the mouse.
- To move your view left, right, up or down, press shift + the middle mouse button, and move the mouse. You can also use just the scroll wheel to move up and down.
- You can also use the numbers on your numpad to get in a different position.
- To select/deselect everything, press A.
- To select only one object, press the object with the right mouse button. You can deselect is by pressing Shift + the right mouse button. Of course you can also deselect by pressing A, but it will deselect everything.
Anything you select will be highlighted orange.
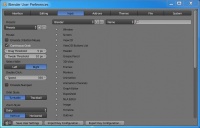
If you don't like these controls, you can go to the info panel > file > User Preferences. A new window will pop up, in which you can change any keyboard shortcut you want. You can also select some presets, which are exact replicas of key configurations in other 3D model software.
Edit Mode
Let's get back to the 3D view window. Right now it's set to object mode. If you set it to edit mode (shortcut: Tab), you'll immediately see that some things will change. The toolbar in which you switched to object mode shows some options, and the selected object will show it's vertices, lines and faces. A vertice, or vertex, is a small dot in your 3D model. If you connect 2 dots, you will get a line. If you connect 3 or more dots, you will get a face. right now you can start changing the model that's loaded into your window. In this case, it's the cube.
So let's look at the new options that came with edit mode. You can see that there are 3 new buttons with an image of a cube on them. Pressing those buttons will change the select mode. Pressing the first button will activate vertice select mode, pressing the second button will activate the edge select mode, and pressing the third button will activate the face select mode. With a vertice, edge or face selected, you can start changing your 3D model. Just like in edit mode, you can select something by pressing the right mouse button. If you want to select multiple things, press shift + right mouse button.
Transformation
If you are trying to learn how to use Blender, it's useful to learn the keyboard shortcuts. Almost everything has a shortcut in Blender. That's why I will explain this part on the basis of keyboard shortcuts. The following transformations can be done in object mode AND edit mode, unless noted otherwise. If you suddenly realise you don't want to perform the transformation, you can press the right mouse button/escape to stop the ongoing operation.
Translate: Press G on your keyboard, move your mouse and left click when you're satisfied with the position. You can also move it along a specific axis, by pressing G and then X, Y or Z. If you want to translate more accurately, you can left click and drag the axes that appear around your selection. Please mind that Z is the vertical axis in Blender!
Scale: To scale your selection, simply press S. if you want to scale it along a specific axis press X, Y, or Z, after pressing S. The scale will be displayed in the bottom left corner. If you want to scale precisely, you can enter the scale factor after pressing S. It is also possible to combine those 2 options, for example 'S Z 10'. This will make your selection ten times bigger along the Z axis. It doesn't matter if you put the scale factor or the axis first. 'S 10 Z' should work as well.
Rotate: This works the same scaling, but it uses R instead of S, and instead of the scaling factor, you can set the angle. By default your selection will go clockwise. If you use a negative angle it will go the other way around.
Extrude: This one only works in edit mode. Just press E while a vertice, edge or face is selected, and it lets you choose how far you want to extrude it. Of course you can also choose an axis. If it has selected an axis by default, you can undo that by pressing X, Y or Z.
There are more options that I won't be explaining here. It's very useful to make use of a cheat sheet.
Creating a Road
One meter in Blender is equivalent to 100 meters in Mario Kart Wii, so the road should be about 20-40 meters in length.
Array + Curve Method
There is a nice and quick way in Blender to make road, but only a few custom track creators know about it. Here is a guide how to make roads:
- Start with a new scene. Press A to select everything, and then press Delete or X to remove everything. Now your scene is empty.
- Go to the toolbar at the left of the screen and select the 'Create' tab. Now select 'Plane' from the list.
- Now we are going to scale it down a bit, so your road will be smoother. Press 'S X .1'. Now press enter to apply the transformation.
- Go back to the 'Create' tab, and click 'Path'. Now there will be a Path in your 3D view. If you can't see it, go into edit mode.
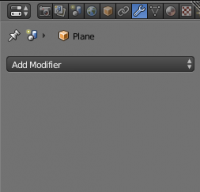
- Select the Plane you just created by right clicking on it. Go to the properties panel, and select the button with the wrench on it.
- Now there will be a drop down menu. Click it, and select the 'Array Modifier'. Put the count up a bit. Depending on what you're trying to make, you may also want to mess around with the other settings. Do not press 'Apply' yet. Also enabling 'Merge' will greatly reduce your vertex count at no loss of quality by merging vertices in the array that share the same location.
- Add another modifier, called the 'Curve Modifier'. Select NurbsPath in the 'Object box'. Your plane may change it's position a bit. That's not a problem.
- Now select the curve again. You can see that the curve is made up out of vertices. You can move and extrude those vertices, and plane will be affected by it. Tip: Sometimes your road looks good from a certain perspective, but when you change the camera position you'll see it's different than you thought. To avoid that, press Num 7 and Blender will bring you to the top perspective (You may want to press 5 as well). Tip 2: Adjust the 'Count' in the array modifier, so your road exactly fits the curve.
- When you're done, go into object mode again, and select your Plane. Now you can press 'Apply' in your array modifier and curve modifier.
Another tip: if you map your road before applying your modifier, your texture will be applied to the entire road, which saves a lot of work. UV Mapping will be explained in the following chapter.
Loft Along Spline Method
- Start with a new scene. Press A to select everything, and then press Delete or X to remove everything. Now your scene is empty.
- Press SHIFT+A or go to the toolbar at the left of the screen and select the 'Create' tab. Under the curves selection, add a curve. Blender supports Bezier, NURBS, and PATH curves by default.
- Press SHIFT+A or go to the toolbar at the left of the screen and select the 'Create' tab. Under the mesh selection add a 2d mesh (i.e. plain, circle). Model an extrusion of what your road will be.
- Go into object mode and with the extrusion selected press ALT+C and press 'Curve from Mesh/Text'.
- Go to the properties panel with your curve selected (not extrusion) enter the curve properties tab.
- The twisting modes will adjust the level of twisting.
- In the texture space sub-section, keeping 'Auto Texture Space' enabled will let blender automatically generate UV coordinates will be very useful soon.
- Set 'Bevel Object' to your extrusion you just modeled
- When you are done with your road, select your main curve (not extrusion) and press ALT+C. Click on 'Mesh from Curve/Meta/Surf/Text'. This will convert your curve object to an actual mesh.
- Note: Your UV coordinates will be automatically generated in this step, which will save you a lot of work. UV Mapping will be explained in the following chapter.
Creating Materials
Before you can export your model and import it into Mario Kart Wii, you should pay attention to the materials. If you added the texture but not the material, your texture won't be displayed in-game. If you follow these steps, there shouldn't be any problem.
- Select your object/faces. It doesn't matter if you're in object mode or edit mode.
- Go to the properties panel, and select the material button (orange/black circle). You can see there's already a material. If you this one, just rename it to whatever you like by double clicking on it. If the material is already in use, press the plus button.
- Click the texture button (red/white checker), which is at the right of the material button. If you do this for the first time, you'll see a label that says 'Type:'. Next to that is a drop down menu. In that menu, select 'Image or Movie'.
- Now you can open your image. It will appear in the preview window. This is your texture.
- As you can see, your image still doesn't appear on your object or face. To do that, create a new window by dragging the triangle in the top right corner of your 3D window to the left.
- Change this window to 'UV/Image Editor'.
- Now go to your 3D window again. Set the viewport to 'Texture'. Make sure you're in edit mode, and the correct faces are selected. Now press U, and select unwrap from the list that appeared.
- In your UV/Image Editor, click on the little photo and select your texture from the list.
- Now your texture appears on your faces. You can make edits to the UV mapping now, the controls in the UV editor are the same as in the 3D view.
Here is a video tutorial:
Please note that Mario Kart Wii will only display one material per object. It is recommended to just make your model 1 object, and when your model is done you should go into edit mode, select everything, press P and click 'separate by material'.
Now there will be multiple materials, and there will only be one material per object, which is what you want.
Exporting
Most custom tracks models are imported with Brawlbox or BrawlCrate nowadays. Brawlbox and BrawlCrate give you the option to import a DAE file, however, they are unable to import DAEs exported from Blender. There is an easy solution for this.
Before exporting, make sure your track has only meshes (objects with geometry). Other objects such as lights, cameras, and armatures will corrupt your track in BrawlBox or BrawlCrate.
- Export your track as .fbx file
- Convert your track to DAE with Autodesk FBX Converter 2013.3.
- Now you can import your track into Brawlbox without problems.
If you have made a KCL model, and you want to create your KCL with Wiimms KCL Tools, you should do the same, but you should export it as .obj and enable 'Material Groups' in the .obj export settings.
Modeling with Blender 2.8x
This tutorial was written by Lovelifeandtpose024. Many things remain the same, but not all. This tutorial uses the EEVEE render engine. To make sure that you are in EEVEE rendering, go to the properties panel, click on the TV icon, and change the render engine to EEVEE.
Shortcuts
Blender 2.8 was made easier to use, and thus, shortcuts and hotkeys have been changed. For example, selecting is left click by default now, and right click brings up a list of options to modify the selection instead of moving the 3D cursor.
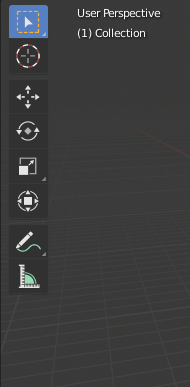
Modellers using 2.8x do not have to rely on shortcuts as much as in 2.79. Many options, such as cursor selection in the right hand corner, are found around the edges of the 3D viewport. The cursor types, for example, let you translate, scale, and rotate objects - thus eliminating the need to remember the shortcuts.
If you cannot find an option or do not remember the shortcut, press F3 to open a search tab and type in the desired option.
Creating Materials
Material creation has changed quite a bit since 2.79.
- Select your object/faces in object or edit mode.
- Go to the properties panel. You will see a list of icons in a column. Select the one that is just above the bottom icon; it looks like a checkered sphere (if you hover over it, it says "Material Properties".)
- Click the "New" button. Name the material whatever you want.
From here, there are two methods. Method 1 is faster, but Method 2 allows you to understand how the material is set up. Keep in mind that you can hover over any button to see what it does.
Method 1:
- In the "Surface" tab just below the material, click on the circle inside the box next to "Base Color". Make sure that "Use Nodes" is enabled.
- Click "Image Texture" from the list of options.
- Click "Open" right below the base color. It will be shortened to "O" if your properties panel is small.
- Locate your image texture and open it.
Method 2:
- Split your screen in half by hovering your mouse cursor over a corner of the 3D viewport and drag in any direction towards the middle of the screen. Your mouse cursor will look like a "+" before you start dragging.
- Change the editor type to Shader Editor. This is done by going to the top right corner of the screen (assuming you have not changed the header location), clicking the square with an icon of a grid and sphere, and selecting "Shader Editor" from the drop-down list.
- In the shader editor, you will see a Principled BSDF node and a Material Output node. Press Shift-A to add a new node, go down to "Texture", and select "Image Texture". Click on "Open" and open your image file.
- Connect the Image Texture node's "Color" output to the Principled BSDF's "Base Color" output by dragging from the "Color" output to the "Base Color" input.
You can drag the corner of one window into another to another to get rid of the split screens.
Although there are numerous nodes, almost all of them cannot be used in Mario Kart Wii, so there is no need to be concerned with them.
You will probably not be able to see your image texture on your object at first. You need to change the viewport shading to do so.
Method 1
- Change your viewport shader to Material or Rendered. Rendered may be too dark without lighting.
Method 2
- Click on the 'solid' viewport shader.
- Click the arrow to the right of the shaders.
- From the drop-down menu, change the 'Color Type' to texture. You can change other viewport settings if you wish.
Here is a video tutorial for how to create materials:
Anything else not covered here should be similar or the same as Blender 2.79.
