KMP Editing
This will tell you all the basics of editing the KMP file in SZS Modifier. Editing the KMP is part of making a custom track, as it contains data for start position, CPU routes, object placement...
This tutorial is covered with images from the KMP of The Hole Cave, a custom track. It's good to know, for this tutorial, that the track goes in a clockwise direction when looking at the map from the editor. That track was chosen for the tutorial because of it's relatively simple design. It shares many similarities with the KMP file of N64 Bowser's Castle.
The KMP Modifier program is mentioned several times in this page, and it's use is to increase or decrease the amounts explained later.
Note that the Objects section of this guide makes use of object names, not object numbers. By default, the numbers are displayed. To get the names to be displayed, you have to download and extract this XML into your SZS Modifier install directory: http://www.mediafire.com/?0tzr49x0gq51gx9
If you're an experienced hacker and want to look further into the KMP, such as hex editing, you can take a look at the KMP (File Format) page.
KMP Editing
The KMP editor displays an image based off from the minimap of the course, not it's actual model, so you have to create that before editing the KMP.
General Info
- To move a point around, click on it and drag it around. The only section that doesn't involve points is the checkpoint one, which will be discussed later.
- When moving points, you'll notice that you can only move the dots in the X and Z axis, that means right/left and foward/backward. To change the height, which is the Y axis, you have to double-click the value in the box in the bottom part of the window. To know what to input, you have three choices:
- Guess the value by yourself, by trial and error.
- If you created the model using Paint, you can use the formula: (MaxY - MinY) / 255 * GrayscaleValue + MinY
- To find the MaxY and MinY, you have to look in the box that appears in the Model Editor while only the polygon of the road is selected
- If you created the model in a 3D modeler: most modelers can tell the X, Y and Z coordinates of any point in the model. That doesn't apply to Google Sketchup - if you're using it, you can discover the Y position of a certain road section by drawing a simple square on top of the model, exporting it as OBJ, and looking inside the OBJ file using a text editor, where the data for positions is stored.
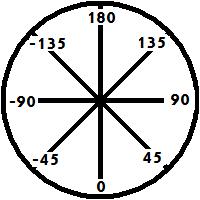
- The angles used for start, object, AREA, camera, respawn, cannon and MSPT positions' rotations start with 0 for the bottom (pointing south), and follow this setup:
Notice that upwards (pointing north) can be either 180 or -180.
Start Position
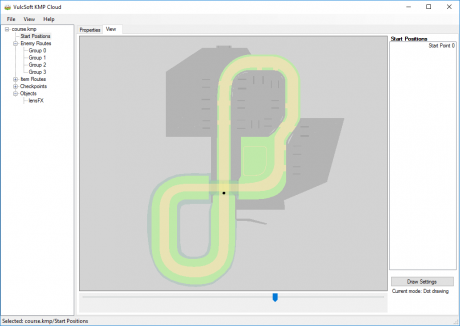
This is the position where the players start at at the beginning of the race. It's rather easy to edit this, since you simply move the dot to it's position and set it's Y value and rotation (explained how above). To prevent the camera under the ground bug, change its Y value to something slightly higher than other objects directly on the track.
Enemy Routes
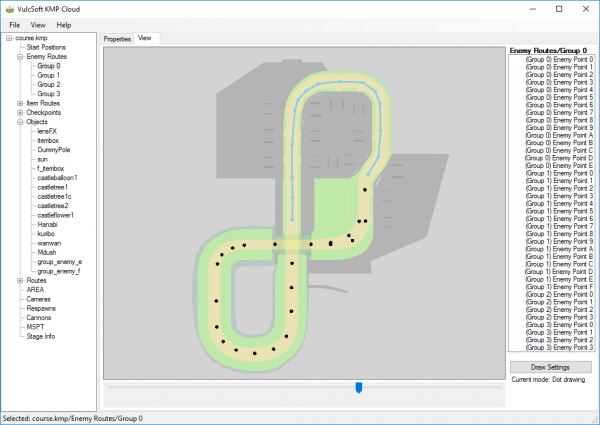
The routes that the CPU characters follow are set by lines of points. To edit then, you drag then to the new position and set the Y, but you don't need to set rotation for a CPU route point. The points must be kept in the same order than the original layout, since the CPU will follow the points in order.
- ID Column: Use this to know the order
- ? Column: Unknown function
- Settings Column: Specific point settings
When the players are supposed to split in two different routes, as shown in the picture (where they split in two directions, near the end of the track), the cpu routes are split in multiple "Sections", as also shown in the picture. To know what order the CPU will follow all the sections, you can open the KMP file in the KMP Modifier and look.
Sometimes, the CPU are only allowed to follow a specific section in certain conditions. For example, in SNES Mario Circuit 3 the path splits in two at a point, but the CPU only follow the lower one if they have a mushroom item. What controls that is unknown, althrough it might be something in the Settings column.
Item Routes
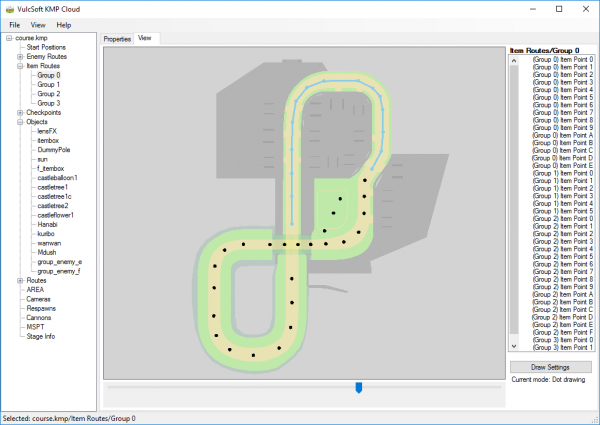
The Item routes set the paths that the Bullet Bill and the Red/Blue shells will take. They have the exact same format of the CPU routes section and are edited the exact same way, so every information that applies to them apply here as well. But they are usually more complex, having more points and sections than the CPU do. That's because the CPU have an AI to help then following the routes, but the shells and bullet bill don't, so they follow the routes exactly as they are set.
Checkpoint Positions
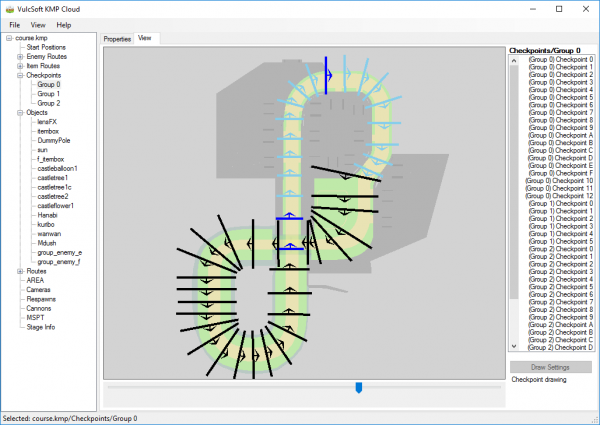
The basics of editing the checkpoints are the same of editing CPU and Item routes, so most of their information also apply here. To move a checkpoint, drag the end of the line as if it was a dot. There are no Y positions in the checkpoints, so you only have to drag then to their positions. To know the correct direction of a checkpoint, tick the "Show Arrow" option. There is an option to draw a line showing which parts of the track are controlled by checkpoints and which parts aren't. Part's that aren't controlled can cause positionjumping. (Positionjumping is: you're last but for a few seconds the screen says you're 4th)
- Respawn Column: It tells which respawn the player will appear at after falling from that checkpoint's area, check Respawn Positions for more info
- ? Column: This is actually known:
- 00: First checkpoint, it makes the lap count work
- FF: Normal checkpoint, only used for placement and respawn
- 01, 02, 03 etc: Key checkpoint, you must pass through each of those in order, you can't skip any of those and cross another Key checkpoint unlike the normal FF ones, use to prevent ultra shortcuts
- Last and Next Columns: This ones make the checkpoints get "linked". When you add more sections, you have to write -1 in the "last" column of the first checkpoint and -1 in the "next" column of the last checkpoint in EVERY section you add. This is necessary and required if, for example, your track has a shortcut. If one of the checkpoints in a section is not linked to the next and the past, your track will not work; and if you select back your section and -1s appear as -127s, just write up -127 instead of -1.
Object Positions
This are the places the objects are, fust like goomba's or item boxe's.
- ID: object number (0, 1, 2, ... )
- Type: which object
- Unknown: ???
- x, y, z: position
- x, y, z angle: orientation
- x, y, z scale: object size (1 = normal)
- Settings 1 to 5: depending on the object (For exact settings see the objects page)
Routes
AREA
see Cameras
Cameras (CAME)
see Cameras
Respawn Positions
This are the places where you setted back when you fall of the course. Use the Respawn setting in the checkpoints settings to enter the ID of the respawn point you want.
Cannon Positions
This are the place where the cannon shoots you to.
MSPT
After battles and competitions have ended the players are placed on this point.
Advanced
Links
Main Tutorials
Introduction –
Textures –
Scale –
Modeling ⇒ Using Blender –
BRRES: CTools
BRRES: BrawlBox –
BRRES: RiiStudio –
Minimap –
Solidity –
KCL: Wiimms Tools –
KMP Editing
Object Editing –
Cameras –
Cannons –
Post-effects –
Videos
Battle Arenas
Battle Arenas –
Enemy routes in battle arenas ⇒ Using Wiimm's Tools –
Coins
Misc. Tutorials
Getting Files –
BrawlBox Tricks –
Animations –
Shadows –
Mipmaps
Custom Effects –
Moving Terrain –
Music –
Ports –
Paint Remakes –
Tutorial Archive
Extended presence flags: Track Tutorial –
LE-CODE Track FAQ
Testing and Reviewing
Testing a Track –
Visual Review –
Track Transformation –
Fixing Errors
Software
3D Tools –
BrawlBox –
CTools Pack –
KMP3D –
KMP Cloud –
KMP Modifier
Lorenzi's KMP Editor –
MagicY –
Material Tool –
Post-Effect Editor –
Wiimms SZS Tools –
Wiimm's Tool Manager
Other
KMP Objects –
Custom Objects –
Model Database –
Tutorial Archive
