Enemy routes in battle arenas
- File formats
- KMP File Format & Sections
- AREA type
- Cameras
- ENPT Settings
- ITPT Settings
- Item Settings - Item Boxes
- Item Settings - Objects
- Lists
- Tutorials
- KMP Editing
- KMP Editing/Cameras
- Start Position
- Check Point
- Respawn Point
- Cannon
- Presence flags
- Enemy routes in battle arenas
- Testing a Track
- Visual Review with »wkmpt DRAW«
- Tools
This article is about enemy routes in battle arenas. Nintendo used other methods to create the enemy route system than for racing tracks. This article analyses Nintendo's work and gives a tutorial for custom battle arenas.
Definitions
Enemy routes are divided into 2 logical groups for battle arenas:
- Dispatch points
- Dispatch points are special routes with exact 1 route point. The NEXT links point to different routes, which have at least one end in the neighborhood of the dispatch point. Dispatch points have never PREV links and always 2 or more NEXT links.
- Standard routes
- All other routes that are not Dispatch points are standard routes. Standard routes have usually at least 2 points and are used bidirectionally by the enemies. Standard routes with 1 point can be detected by an existing PREV link. Both settings of standard routes are always 0.
The section order of routes and dispatch points is irrelevant as usual.
Each standard route has 2 ends: The first point of the route related to the PREV links, and the last point of the route related to the NEXT links. PREV and NEXT links are lists with 6 entries. This means that each end of a route can be connected to 0–6 other routes or dispatch points.
For dispatch points, the first and last points are the same. Only the NEXT links are used. The impact of the PREV link is unknown.
How Nintendo implemented enemy routes of battle arenas
Nintendo created standard routes, which follow some main directions (e.g. counterclockwise). This keeps the logic clean. Each standard route consists of 2 to 5 points. Each end of the standard route is connected by a single PREV and a single NEXT link to a dispatch point in the neighborhood. Each dispatch point is linked (NEXT links only) to standard routes of the neighborhood. Here, it doesn't matter which end of the standard route is closer to the dispatch point; the engine selects the correct end automatically.
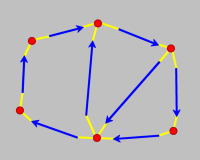
For example, see the image on the right:
- The red points are the dispatch points, existing of exactly 1 point.
- The blue arrows are the standard routes with 2 or more (usually up to 5) points.
- The yellow lines are the bidirectional connections between the dispatch point and standard route. Bidirectional means that the NEXT links of the dispatch point directs to a standard route, and one end of the standard route directs to the dispatch point. If only a one-way connection is needed, the other one is dropped.
The enemies will follow the yellow and blue routes in both directions. At each dispatch point, they choose a new route, and maybe the one where they come from.
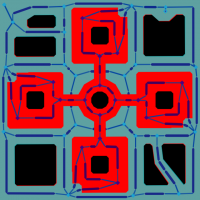
The second image shows the complete enemy route system of Block Plaza. It was drawn by wkmpt DRAW v1.60a with special support for dispatch points.
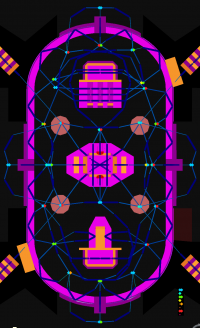
The third image shows the complete enemy route system of Funky Stadium with focus on dispatch points. See Settings of Dispatch Points for details.
Some observations
SNES Battle Course 4 (A21) don't use dispatch points. The following observations are based only on the other 9 arenas:
- All dispatch points have 0 PREV links and 2 or more NEXT links. (1 NEXT link makes no sense.)
- All standard routes have at least 1 PREV and 1 NEXT link.
- Both settings of all standard routes are always 0.
- Chain Chomp Wheel (A14) uses standard routes, that are directly linked to other standard routes, in addition to dispatch points.
- Delfino Pier (A12) has 2 standard routes with 9 points each.
- Dispatch points of Block Plaza (A11) has 2 standard routes and Dispatch points of GBA Battle Course 3 (A22) 8 standard routes with exact 1 point. All 10 routes have exact one PREV and one NEXT link. Dispatch points have never PREV links.
- For halfpipes, routes with 3 to 5 points are used and the middle points lays on the halfpipe KCL. See Funky Stadium (A13) for examples.
- GBA Battle Course 3 (A22) needs 8 outgoing connections at the center, but max 6 links are possible. So Nintendo placed 2 dispatch points with a distance of 113 units in the middle. The points are not connected, but share some destinations.
- The routes of DS Twilight House (A25) are very symmetric, but the settings of the dispatch points are not. This is the same for all other symmetric arenas.
- Dispatch points have a width (scale) between 12 and 100. Only DS Twilight House (A25) uses 6 or 7.
- Route points have a width (scale) between 2 and 103.
- Nintendo used the values 0, 5, 10, 15, 20, 30 for ENPT Settings #1. All values are used by dispatch points and standard routes. Looks like a weight or scale. This is different in comparison to racing tracks.
- Nintendo used the values 0, 2 and 20 for ENPT Settings #2 of dispatch points and values 0, 1, 2 and 10 for standard routes.
- Nintendo used the values 0x00 and 0x80 for ENPT Settings #3. The value for dispatch points is always 0.
Some more observations by Wiimm while developing Bash 'n' Dash 'n' Battle:
- The enemies tend to drive towards itemboxes. This means, that placing itemboxes is a tactical way to lure the enemy into specific areas.
Route Settings
The KMP sections ENPH, ITPH and CKPH share the same data structure of 16 bytes for each record. The bytes of offsets 0x0e and 0x0f are usually 0 (padding). The only exception is section ENPH for battle arenas, and only for dispatch points if no PREV link is defined:
- The value of offset 0x0e is between 0 and 7.
- The value of offset 0x0f is either 0x00, 0x40, 0x80 or 0xc0.
The meaning of both bytes is unknown. Page Settings of Dispatch Points focuses on the settings used by Nintendo.
Tutorial
The tutorial is very simple:
- Select central places all over the map, where enemies should change the direction.
- Insert dispatch point at these central places.
- Connect the dispatch points by routes. A distance of 500 to 2000 from route end to dispatch point is good.
- Define one-way connections where needed (e.g. jump down, cannon).
- Define settings for the dispatch points (experimental, because impact is unknown).
- Link the ends (PREV and NEXT) of the standard routes to the nearest dispatch point.
- Link NEXT links of dispatch points to the standard routes, that points to it (based on step before with exception of one-way links).
- Leave the PREV links of dispatch points empty and avoid automatic calculation of PREV links by a tool.
Steps 1 to 5 must always be done manually by the user. Steps 6 to 8 can be done by a tool. Tutorial »Creating enemy routes of battle arenas with Wiimm's tools« explains the automatic connection using Wiimms SZS Tools.
Links
Main Tutorials
Introduction –
Textures –
Scale –
Modeling ⇒ Using Blender –
BRRES: CTools
BRRES: BrawlBox –
BRRES: RiiStudio –
Minimap –
Solidity –
KCL: Wiimms Tools –
KMP Editing
Object Editing –
Cameras –
Cannons –
Post-effects –
Videos
Battle Arenas
Battle Arenas –
Enemy routes in battle arenas ⇒ Using Wiimm's Tools –
Coins
Misc. Tutorials
Getting Files –
BrawlBox Tricks –
Animations –
Shadows –
Mipmaps
Custom Effects –
Moving Terrain –
Music –
Ports –
Paint Remakes –
Tutorial Archive
Extended presence flags: Track Tutorial –
LE-CODE Track FAQ
Testing and Reviewing
Testing a Track –
Visual Review –
Track Transformation –
Fixing Errors
Software
3D Tools –
BrawlBox –
CTools Pack –
KMP3D –
KMP Cloud –
KMP Modifier
Lorenzi's KMP Editor –
MagicY –
Material Tool –
Post-Effect Editor –
Wiimms SZS Tools –
Wiimm's Tool Manager
Other
KMP Objects –
Custom Objects –
Model Database –
Tutorial Archive


