Difference between revisions of "Creating a BRRES with BrawlBox"
m (→Importing the DAE File: readability) |
|||
| Line 5: | Line 5: | ||
== Importing the DAE File == | == Importing the DAE File == | ||
| − | To create a BRRES in BrawlBox, you need to import a DAE file, preferably in the [[3ds Max]] format. The default settings in the 3ds Max DAE exporter are usually correct. If you have [[SketchUp]], the best option is to export the model as OBJ and import it in 3ds Max, then export as DAE; if you don't wish to do that, export the model as OBJ and convert it to a .FBX file with [https://www.autodesk.com/developer-network/platform-technologies/fbx-converter-archives Autodesk FBX Converter 2013.3], then choose FBX 2013, then convert that FBX to DAE. If you have [[Blender]], export the model in FBX format. After you have your FBX file convert it to a DAE file with the tool above. | + | To create a BRRES in BrawlBox, you need to import a DAE file, preferably in the [[3ds Max]] format. |
| + | * The default settings in the 3ds Max DAE exporter are usually correct. | ||
| + | * If you have [[SketchUp]], the best option is to export the model as OBJ and import it in 3ds Max, then export as DAE; if you don't wish to do that, export the model as OBJ and convert it to a .FBX file with [https://www.autodesk.com/developer-network/platform-technologies/fbx-converter-archives Autodesk FBX Converter 2013.3], then choose FBX 2013, then convert that FBX to DAE. | ||
| + | * If you have [[Blender]], export the model in FBX format. After you have your FBX file convert it to a DAE file with the tool above. | ||
First make a new BRRES (''File → New → Brres Resource Pack''). Then right-click the BRRES node and click ''Import → Model''. | First make a new BRRES (''File → New → Brres Resource Pack''). Then right-click the BRRES node and click ''Import → Model''. | ||
Revision as of 17:59, 19 January 2020
This page is a part of the Custom Track Tutorial. Back to the main tutorial page.
Introduction
This page describes how to create a Custom Track BRRES from scratch with BrawlBox. You will import the model from an exported DAE into MDL0, import the textures into TEX0 and edit some settings inside the MDL0 to make your model look right in-game. This page contains information that is useful even after your BRRES is created, even if it was made with another program.
Importing the DAE File
To create a BRRES in BrawlBox, you need to import a DAE file, preferably in the 3ds Max format.
- The default settings in the 3ds Max DAE exporter are usually correct.
- If you have SketchUp, the best option is to export the model as OBJ and import it in 3ds Max, then export as DAE; if you don't wish to do that, export the model as OBJ and convert it to a .FBX file with Autodesk FBX Converter 2013.3, then choose FBX 2013, then convert that FBX to DAE.
- If you have Blender, export the model in FBX format. After you have your FBX file convert it to a DAE file with the tool above.
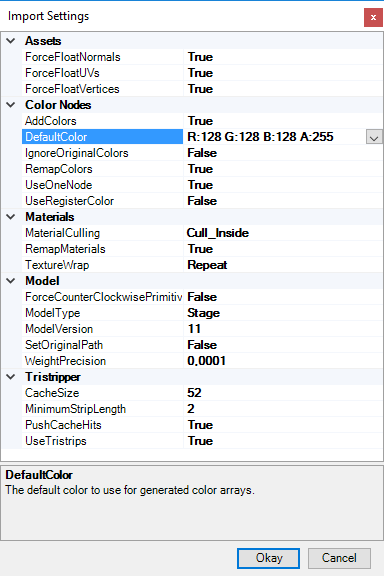
First make a new BRRES (File → New → Brres Resource Pack). Then right-click the BRRES node and click Import → Model. Use the following settings:
The DAE will then be converted into an MDL0 file, which will be in the 3DModels(NW4R) folder inside the BRRES. If you're making the course model, make sure the MDL0's named "course". This applies to any other BRRES you might be replacing.
A ModelVersion different from 11 or other incorrect settings will make the game freeze. You might walk against some problems, most noticeably randomly moved faces/polygons and rotated models. This can be fixed by swapping the Axis Conversion setting when exporting the model, from Y-up to Z-up or vice versa. If that doesn't work instead try setting the pivots in 3ds Max. Set all pivots' positions to the origin (0,0,0) and rotate them -90 degrees on the X-axis.
If you have imported it, you might wish to rename things (such as meshes or materials) for more readability.
Importing the Textures
You can import the textures by right-clicking the root or using the Edit drop-down menu and selecting Import → Texture (or Folder; in this case, put all your textures on a folder and select it). Make sure you set the texture format to a format supported by Mario Kart Wii. The following formats are supported/recommended:
- I8
- IA8
- RGB5A3
- RGB565
- CMPR
You should use CMPR for most textures; textures with opacity (partially transparent) should be RGB5A3. The CI4 and CI8 textures need their palette names in their respective material references.
The textures will be imported as TEX0 files inside the Textures(NW4R) folder in the BRRES. The references which point to them are located in the Materials section of the MDL0. If any textures are missing or referenced incorrectly, the game will crash. You can rename the textures and references to fix this if needed.
You should set a number of mipmaps for each texture you import. Three is usually a good amount for normally sized textures. Large textures might use more and smaller ones might use less; you'll have to experiment with this. You will also need to make the Material use those mipmaps (see below). The mipmaps that BrawlBox creates are more suitable for Super Smash Bros. Brawl. If you want to use higher quality, more Nintendo-like mipmaps you should create your tex0 Textures with Wiimm's Image Tool. See: Creating Mipmaps with wimgt.
At this point, before editing shaders or materials, you should test your model in-game to see if it'll load (even if you haven't made the KCL or KMP yet).
Shaders
The default shader created by BrawlBox will work correctly in Mario Kart Wii. Navigate to the Shaders folder under the MDL0 to edit them; you might want to open Stage0 from Shader0, look for ColorScale and set it from "MultiplyBy4" to "MultiplyBy2" or "MultiplyBy1". This will set how bright your textures will be in-game. If you are not happy with any of the settings, you can experiment with the "Default Color" setting when importing the DAE.
Materials
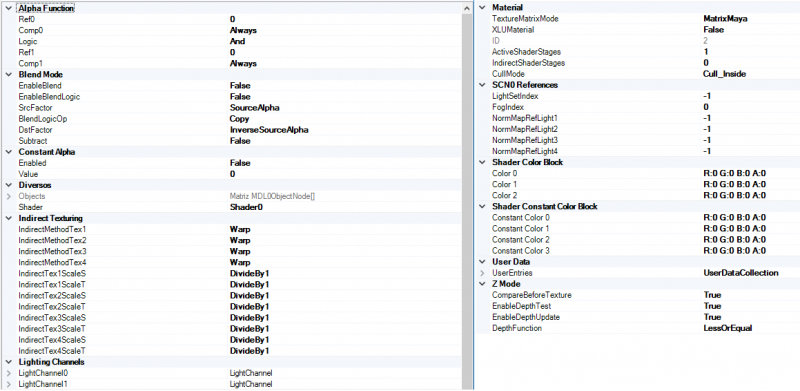
Material settings are very important to make your track look good. Note that messing too much with the material settings will most likely result in definitions which are incorrect or unsupported by Mario Kart Wii. Navigate to the Materials folder under the MDL0 to edit them. Some of it is explained here:
Materials for Normal Textures
The settings for textures without transparency (fully opaque textures) are almost completely right after importing. The only changes they require are for the light channels. Under SCN0 References you should have all set to -1 except FogSet, which should be 0. Also, make sure everything under "Z Mode" is set to True.
Materials for Textures With Opacity
To enable opacity on a mesh/polygon, browse to the mesh's material. The settings should be the same as the materials for the opaque textures, except for:
- EnableBlend = True
- XLU Material = True
- CompareBeforeTexture = False
You also have to browse to the mesh under the "Objects" section in the MDL0 file and set the Draw Pass to XLU (Transparent) for each mesh/polygon. This should prevent the Harry Potter Effect. You can also make a material (more) transparent by setting Constant Alpha Enabled = true and the Value to the value of transparency (0 = opaque, 255 = fully transparent). However, this setting doesn't ensure a model without the transparency settings above becoming transparent.
MipMaps
MipMaps are smaller versions of the textures, which are displayed when you're further away from the models, to improve the visuals of your track. Your textures will look smoother and you can heavily reduce moiré patterns. For mipmaps to be displayed, you must navigate to the texture reference under each material and set the MinFilter option to Linear_Mipmap_Linear. The textures must actually contain mipmaps for this to work (explained above).
Culling
The CullMode setting is set to "Cull_Inside" by default. This will make the "inside" of the models invisible and the outside visible, which is the usual setting. Setting it to Cull_Outside will make the opposite side of the model visible (the blue side in SketchUp) and setting it to Cull_None will make all sides of the model visible. This should be used for models which can naturally be seen from both sides, such as fences.
Materials and Shaders
Materials have to be ordered by Shader references: Materials with reference to Shader1 should be UNDER Materials with reference to Shader0;
Schematically:
- Materials:
MaterialA(Shader0)
MaterialB(Shader1)
- Shaders:
Shader0
Shader1
This is because, for a strange and unknown reason, BrawlBox orders the Shaders by the Materials' references: so, if you have
- Materials:
MaterialA(Shader1)
MaterialB(Shader0)
you will have, not apparently but in file level
- Shaders:
Shader1
Shader0
You have therefore to order your Materials by Shaders' references to avoid this problem.
Next
It is a good idea to test the scale of your model as soon as possible, so follow the Solidity tutorial to make your track solid. You will also need to edit the KMP to put the start position over the track. You can see more stuff that can be done with BrawlBox in the BrawlBox Tricks page. Refer back to this tutorial as needed as you continue to refine your model.
Links
Main Tutorials
Introduction –
Textures –
Scale –
Modeling ⇒ Using Blender –
BRRES: CTools
BRRES: BrawlBox –
BRRES: RiiStudio –
Minimap –
Solidity –
KCL: Wiimms Tools –
KMP Editing
Object Editing –
Cameras –
Cannons –
Post-effects –
Videos
Battle Arenas
Battle Arenas –
Enemy routes in battle arenas ⇒ Using Wiimm's Tools –
Coins
Misc. Tutorials
Getting Files –
BrawlBox Tricks –
Animations –
Shadows –
Mipmaps
Custom Effects –
Moving Terrain –
Music –
Ports –
Paint Remakes –
Tutorial Archive
Extended presence flags: Track Tutorial –
LE-CODE Track FAQ
Testing and Reviewing
Testing a Track –
Visual Review –
Track Transformation –
Fixing Errors
Software
3D Tools –
BrawlBox –
CTools Pack –
KMP3D –
KMP Cloud –
KMP Modifier
Lorenzi's KMP Editor –
MagicY –
Material Tool –
Post-Effect Editor –
Wiimms SZS Tools –
Wiimm's Tool Manager
Other
KMP Objects –
Custom Objects –
Model Database –
Tutorial Archive

